Sunday, February 10, 2013

Get rid of the useless Ask Toolbar - permanently!

As many are painfully aware of, Oracle continues to not only bundle the Java installation with the useless Internet browser toolbar from Ask.com, but also enable its installation by default. In addition to the toolbar, Ask also replaces your favourite search engine in your browser with Ask.

Furthermore, the Java installation goes as far as to actually recommend installing this useless junk, meaning that any non IT-savvy person is more than likely to leave it checked and install it (after all, it was enabled by default and the friendly Java installed did recommend it, right?).


This way of bundling software and nearly forcefully install it, is reserved for spyware and other mailware, and just makes me mad! At the very least it should be opt-in, not opt-out. Better yet, just keep the useless junk out of Java all together - nobody wants your stinking toolbar, Ask!

To add insult to injury, even if you remove the Ask Toolbar, you can be sure to see it again soon, when the next Java update hits you (which seem to happen quite often lately, due to loads of security fixes for Java, but that's another story).

Seeing the damn thing pop-up on several family members' and friends' computer I support, I found a simple way of removing it silently (in case you want to do it via scripting), but more importantly: Prevent future installations of Ask Toolbar!

Update: Since I made the script to prevent the installation of Ask with Java, a much nicer and more elegant solution has been found by Danilo Roascio on the question I posted to SuperUser.com: How can I prevent Ask.com Toolbar from being installed every time Java is updated?

I've kept the original post intact below for reference, but you should really consider the simple registry fix first.

Uninstalling Ask Toolbar from command line

If you do not want to simply uninstall the toolbar from Add/Remove Programs, here's how to do it from the command line.

From an elevated command prompt, run:

MsiExec.exe /X{86D4B82A-ABED-442A-BE86-96357B70F4FE} /q

The GUID between the brackets is the product code for the Ask.com Toolbar and is at least valid for versions 1.15.9.0 and 1.15.15.0.

Preventing future installations of Ask Toolbar

The simplest way to prevent Ask Toolbar from being installed again I could think of, was to create the folder Ask Toolbar install into and modify the permissions, so no one can write to it.

First, make sure that the Ask Toolbar has been removed. Then copy the following code to Notepad, save it as a .cmd file and run it in an elevated command prompt:


REM Detect processor architecture
set proc_arch=x64
if "%PROCESSOR_ARCHITECTURE%" == "x86" ( 
    if not defined PROCESSOR_ARCHITEW6432 set proc_arch=x86


REM Define Ask Toolbar path

if "%proc_arch%" == "x86" set AskPath=C:\Program Files\Ask.com
if "%proc_arch%" == "x64" set AskPath=C:\Program Files (x86)\Ask.com
set AskReadme=%AskPath%\..\Ask.com_ReadMe.txt
set AskRevert=%AskPath%\..\Ask.com_RestorePermissions.cmd

REM Create dummy Ask Toolbar folder

md "%AskPath%"

REM Add explanatory text file, as to why the dummy folder is there

echo The 'Ask.com' folder is has been created and write protected,> "%AskReadme%"
echo in order to prevent Ask.com Toolbar from being 'accidentally'>> "%AskReadme%"
echo installed, e.g. by Java.>> "%AskPath%\readme.txt">> "%AskReadme%"
echo.>> "%AskReadme%"
echo This has been done using ICACLS by denying write access to the>> "%AskReadme%"
echo EVERYONE security group.>> "%AskReadme%"
echo.>> "%AskReadme%"
echo To revert permissions run:>> "%AskReadme%"
echo %AskRevert%>> "%AskReadme%"

REM Create script to remove restrictions

echo icacls "%AskPath%" /remove:d *S-1-1-0> "%AskRevert%"

REM Deny everyone (SID: S-1-1-0) write access

icacls "%AskPath%" /deny *S-1-1-0:(OI)(CI)W


Please note: ICACLS is included in Windows Vista and later. You can download ICACLS for Windows XP/Server 2003 through Microsoft KB919240, or an updated version through KB943043 (but the latter must first be requested, after which you will receive a link to download it). For this purpose, both versions should work equally well.

I have verified with the installer for Java 1.7 update 13, that the Ask Toolbar indeed does not install, even if I leave the checkbox checked.

Windows Explorer quirk: Access denied

Windows Explorer behaves a little strange if you try to open the folder. Even though you still have read access to the folder, Windows Explorer will tell you that access is denied, even though only write access has been denied.

This doesn't happen if you simply only have been assigned read access in the first place, but it seems to happen when you have been assigned read/write permission to the folder and then been denied write access.

Reverting permissions

The script also adds a 'read me' text file and a script for removing the restriction again. Both are stored in the 32-bit program files folder (typically "C:\Program Files" on 32 bit, "C:\Program Files(x86)" on 64 bit, English Windows installations).

Thursday, May 3, 2012

Upgrade your Dropbox storage by 16 GB for free using Google Adwords

You can get 3 GB extra Dropbox space for free, by using their photo upload feature. But, through referrals, you get 500 MB for each new user you get to sign up.

Someone got the ingenious idea to use Google AdWords as a cheap way to max out your Dropbox referral bonus space. That means 16 GB on top of what you've already got (excluding existing referrals).

Simply create ads using your personal Dropbox referral link, which you can find here, on Dropbox' website.

But, you can apply for a free $75 (or 650 Danish kroner) Google Adwords voucher, which should be more than enough to max out your Dropbox. Have patience. It took me about a month to get my voucher after applying

The process is also described by Lifehacker. It took me about half an hour to get to know the Google Adwords website and setup my campaign. That's all.

Remember to pause your Adwords campaign when Dropbox is maxed out.

Campaign Stats

Here's a few stats regarding my Adwords campaign, from start till my Dropbox was maxed out:
  • Campaign running time: ~2 days
  • First referral after campaign launch: ~8 hours
  • Ads served ("impressions"): 97.750
  • Clicks: 454 (0,46% average "clickthrough ratio" or CTR)
  • Least effective ad CTR: 0,28%
  • Most effective ad CTR: 0,67%
  • Total cost: 170 Danish kroner or about $30 (out of my 650 kroner voucher)
As you can see, my simple text ads were not equally effective. My most effective ad was this:


By completing Dropbox' Get Started guide, the 3 GB photo upload bonus and maxing out referrals, you can get 21.25 GB of Dropbox goodness - for free!

Sunday, March 25, 2012

Upgrade your Dropbox storage by 3 GB for free

Dropbox is awesome, but I quickly ran out of the 2 GB space you get for free.

Now Dropbox is introducing a new feature, letting you upload pictures directly to Dropbox from your Android smartphone.

This is great for automatic backup of your snaps, but Dropbox will also add up to 3 GB of extra space to your account.

A similar feature exists in the beta versions of the Dropbox app for Windows or Mac, but haven't tried either of these yet, but they will also increase your storage.

See also how to upgrade Dropbox by 16 GB using Google Adwords.

Enabling camera upload on Android

It's quite simple to enable in the Android Dropbox app:
  • Ensure the Dropbox app for Android is installed an up-to-date
  • Open the settings menu in the Dropbox app and scroll down to "Camera Upload"
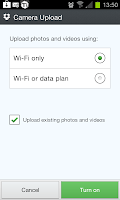
  • Press "Turn on Camera Upload"
  • Select wheterver you want to sync on both Wi-Fi and mobile data or just Wi-Fi. If you don't a have a flatrate data plan, you probably want to select "Wi-Fi only". You can also if the pictures currently on the phone should be uploaded
  • Press the green "Turn on" button
You will get 500 MB extra space just by uploading the first picture and up to five increments of 500 MB as you upload pictures.

Speeding up the process

I didn't have many pictures to upload, but didn't had much space left for my other Dropbox data. Fortunately, it's pretty easy to get your 3 GB extra space with little work. Here is what I did:
  • Configure Android to leave Wi-Fi on while charging
    • In Android settings goto "Wireless & networks", then "Wi-Fi settings"
    • Press the menu button on your phone
    • Press "Advanced"
    • Press "Wi-Fi sleep policy" and set it to "Never when plugged in"
  • Connect your smartphone to your computer via the USB cable
  • Copy about 3 GB of random pictures to the DCIM folder on your smartphone
  • Disconnect phone from the computer and connect it to the charger
  • Leave it charging, e.g. over night, waiting for it to upload the pictures your Dropbox, expanding your storage as pictures are uploaded
  • Cleanup the random pictures from the "Camera Uploads" folder in Dropbox

Optional: Making cleanup easier

Since the Dropbox app renames all pictures it uploads, it can be a bit cumbersome to clean out your random pictures from your not-so-random pictures.

If you select random pictures from a proper camera, you can easily sort the pictures by camera make or model on your computer. Here is how to do it in Windows 7:
  • Open the "Camera Uploads" Dropbox folder in Explorer
  • Press Alt+V to open the view menu
  • Select "Details"
  • Press Alt+V to open the view menu again
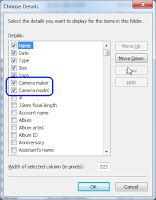
  • Select "Choose details"
  • Check "Camera maker" and "Camera model"
     
  • Click "OK"
  • Click on either the "Camera maker" or "Camera model" header to sort files by that column
  • Select and delete your random pictures by looking at camera maker/model

Tuesday, October 11, 2011

Repair (aka. bypass) safety switches on "dead" Krups GVX2 burr coffee grinder

Every geek needs coffee, but lately my Krups GVX2 burr coffee grinder started acting up.

Sometimes it would stop grinding prematurely, other times it just would not start. Sometimes simply pressing the top lid would do the trick, other times it had to be taken off, put back on and then pressed down. Sometimes I would just give up.

The grinder won't start unless both the top lid is on and the ground coffee container is in place. It seemed that the safety switch for the top lid was being a little over-cautious (aka. broken).

I turns out the two micro switches are held in place by thin strips of cheap plastic, which can evidently break from repeated use.

While perhaps not entirely impossible, I don't see how you can stick your fingers in the blades, unless you're trying hard. So instead of throwing out the grinder, I decided to bypass the switches entirely, so the grinder would work, regardless of the top lid and removable container.

Another option would be to fix the mount for the switches with bits of plastic and/or glue - you decide which option suits you best. In either case, do so entirely at your own risk. It is a device connected to mains electricity after all.

Here is a description of what I did (forgot to take pictures)...

Tools Needed

  • 2 small flat head screwdriver
  • Wire cutter
  • Soldering iron and solder
  • Electrical tape or heat shrink
  • (Butter knife) 

Opening the Machine

  • Remove bean hopper, ground coffee container and any beans left in the machine.
Then remove the dials. The side dial is held in place by three latches, the front dial by friction only.
  • Gently pry off the front dial, using a butter knife (or flat head screwdriver).
  • Use a small flat head screwdriver to pry the side dial a bit to the side, then use another small screwdriver one of the exposed latches. Repeat until the dial comes off.
The large outer shell is held in place by four latches in the bottom. It takes a bit of convincing, before it comes off.
  • Turn the machine upside down.
  • Pull out the four rubber feet.
  • Using a butter knife or small flat head screwdriver, release one of the latches, while pulling down on the shell. It should give a millimetre or two. Repeat for the other three latches.
  • Slide the shell off the machine and turn it again.
In my case, the front metal plate also fell off. Notice the small plastic "hook" holding the wires to the right of the circuit board.
  • Remove the two screws holding the funnel in place and remove it.
  • Unscrew and remove the micro switch from the funnel. Discard the screws if you're going to bypass the switches.
  • Carefully cut the plastic strip on the bottom left of the printed circuit board.
  • Pull up the circuit board to expose the micro switch for ground coffee container.
  • Unscrew and remove the micro switch above the container. Discard the screws if you're going to bypass the switches.
  • Turn the machine upside down, to get the small plastic pins and spring out. Discard them if you're going to bypass the switches.
Correction: It turns out the micro switch just above the container serves an additional purpose: It helps keep the container in place, when the machines spits out the ground coffee.

While it may be necessary to unscrew the switch to work with the wires, I do recommend assembling switch, plastic pins and spring again when done. Else you'll probably need to put a rubber band around the machine, like I have now c",).

Now for the fun part...

Bypassing the Switches

The two switches are serially connected and sits between the power supply and circuit board (PCB). The short wire between the PCB and container micro switch has an extra layer of insulation, to protect it from the heat from the hot resistors. The wire is short as it is, so be careful not to make it shorter, when removing insulation from the tip.
  • Following the wire from the power supply at the bottom, cut it as close to the funnel switch as possible.
  • Following the (short) wire from the PCB to the container switch, also cut this as close the switch as possible.
  • Remove the insulation from both wire ends.
  • If using heat shrink, place it on the long wire.
  • Solder the two ends together. The easiest way to do this, is to heat the wire ends separately and apply just enough solder, to make a nice shiny "coat" on the wire. Then hold the wire ends together and apply heat. Remove the soldering iron as soon as the solder melt and blow lightly.
  • Apply electrical tape or cover the wire ends with the heat shrink and use the soldering iron to shrink it.

Putting it Back Together

  • Put the plastic pin and spring for the container micro switch back in place and screw the switch back on.
  • Put the circuit board back in place, carefully aligning the newly soldered wire in front of the PCB, along the bottom.
  • Press wires back in the small  plastic "hook".
  • Put the funnel and secure it with the two screws.
  • Attach the front metal plate. There are pins that fits in the small holes on either side of the bean hopper.
  • Slide on the shell. A bit of pressure may be needed before it clicks in place.
  • Turn the machine upside down and check that the shell fits snugly.
  • Re-attach rubber feet.
  • Rejoice!

Sunday, April 3, 2011

Replacing self-signed certificate on Synology Disk Station running DSM 3.x with a StartSSL certificate using command line (advanced)

Introduction
I love my Synology Disk Station but been wanting to replace the self-signed certificate, with a certificate from a widely trusted Certificate Authority for a long time.

Unfortunately, even with DSM version 3.0, there is still no way to do this through the web interface. I seem to stand corrected - At Control Panel/Web Services/HTTP Service Options, there is actually an "Import Certificate" button. Haven't tried it myself, but looks like it is possible after all. On the bright side, I gathered a lot of knowledge setting this up through the command line :-).

Through Googling, trial and error, I managed to replace the self-signed certificate with a free, validated certificate from StartSSL.

I am now better protected against man-in-the-middle attacks, as I am presented with a validated certificate from a trusted source, rather than a self-signed certificate which I must choose to trust each time I connect.

The usual disclaimer: I am by no means a *nix wiz. Since this was not as straightforward as it should have been, I decided to post the steps so other people can benefit from it. Use any of the information here to your heart's content, but do not blame me if something goes horribly wrong.

Any corrections, suggestions and other feedback is well appreciated.

Preparation
Ensure telnet/SSH access to the Disk Station is enabled and login as root, e.g. using PuTTY.

DSM 3.0 seems to be missing the openssl.cnf file, which is expected at /usr/syno/ssl/openssl.cnf.

Download the sources from the appropriate version of OpenSSL from http://www.openssl.org/source/, then extract openssl.cnf from /apps/ in the tar ball to a directory on your Synology, e.g. /volume1/share/.

To check your version of OpenSSL:
openssl version
My DS207+ running DSM 3.0 has OpenSSL 1.0.0a (1 Jun 2010).

Update: After upgrading my DS207+ to DSM 3.1 (build 1636), I'm now on OpenSSL 1.0.0c (2 Dec 2010). My DS108j running DSM 3.1 (build 1748) is running OpenSSL 1.0.0d (8 Feb 2011).

Create the directory /usr/syno/ssl and copy openssl.cnf to it:
mkdir /usr/syno/ssl/
cp /volume1/share/openssl.cnf /usr/syno/ssl/
Next, generate a temporary working folder (e.g. /usr/local/ssl/) and change directory to that:
mkdir /usr/local/ssl
cd /usr/local/ssl

Generating the private key and certificate request
Now create a new private key for encryption of the SSL session. OpenSSL will force you to protect the key with a password:
openssl genrsa -out server.protected.key 2048
The password protection must be removed, before the key can be used by the web interface:
openssl rsa -in server.protected.key -out server.key
Create a certificate request (CSR) based on the new key:
openssl req -new -key server.key -out server.csr
You do not necessarily have to enter all details - it depends on what your certificate provider requires. The most important is the "Common Name", which must exactly match the DNS name used to access the Synology, e.g. mysynology.dyndns.org.

With class 1 validated certificates, much of the information you can input to the request, is often discarded by the certificate provider. E.g. only country and common name (CN) is used by StartSSL discards all information from the CSR except the public key.

Depending on your certificate providers request procedure, either upload the server.csr file or copy the contents of the file and paste into the providers website when prompted.

To output the contents:
cat server.csr

Installing the files
  • Save the issued certificate to a directory on the Synology, e.g. /volume1/share/server.crt
  • Copy the certificate to the working folder created:
    cp /volume1/share/server.crt /usr/local/ssl
  • Change into the Synology certificate folder
    cd /usr/syno/etc/ssl
  • Make a backup folder for the old files:
    mkdir bak
  • Copy the old files into the backup folder:
    cp -r ssl.crt bak
    cp -r ssl.csr bak
    cp -r ssl.key bak
  • Remove the self-signed CA certificate and associated files:
    rm ssl.crt/ca.crt
    rm ssl.csr/ca.csr
    rm ssl.key/ca.key
  • Copy the new files to the current folder:
    mv /usr/local/ssl/server.crt ssl.crt
    mv /usr/local/ssl/server.csr ssl.csr
    mv /usr/local/ssl/server.key ssl.key
  • Restart your Synology Station:
    reboot

Thanks to